
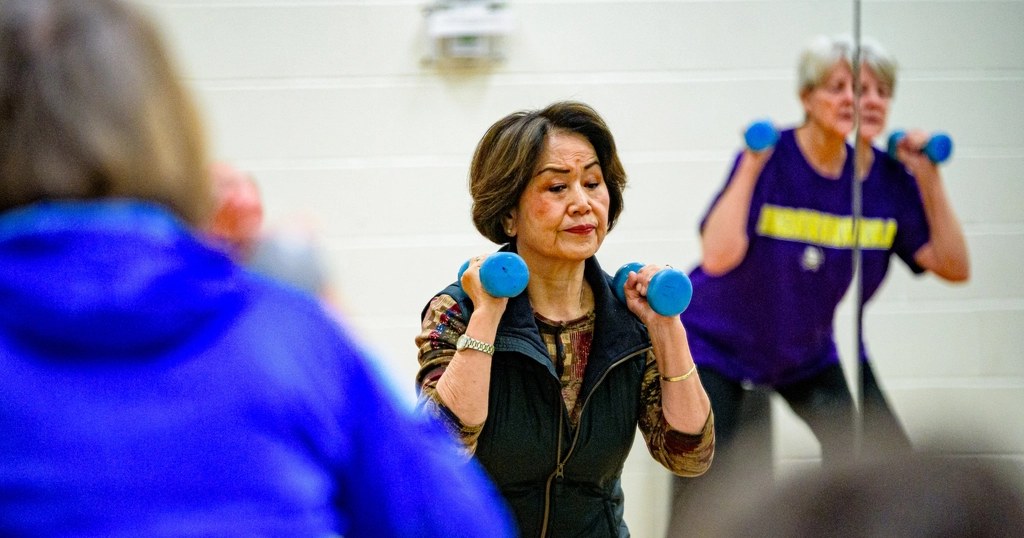
When people think about exercise, they often picture running or cycling. But muscle-strengthening activity is just as important for health, and it is the part most people skip. Health guidelines recommend it for adults of every age, and the benefits show up in everyday life: carrying groceries, climbing stairs, getting up from a chair and staying independent as you get older.
The good news is that you can build strength at home, with very little equipment, in about 20 minutes, twice a week. This guide explains why strength matters, shows a simple full-body routine for beginners, explains how to progress safely and covers the mistakes that most often trip people up.
Key takeaways
- Adults should do muscle-strengthening activities that work all major muscle groups on at least two days a week.
- Bodyweight, resistance bands, filled water bottles or light dumbbells are enough to start.
- Begin with one or two sets of 8 to 12 repetitions, and add reps, sets or weight gradually.
- Good form, steady breathing and rest days between sessions matter more than heavy weights.
- Check with a healthcare professional first if you have a medical condition, are pregnant or have been inactive for a long time.
Why strength training matters
From around the age of 30, we gradually lose muscle mass and strength unless we work to maintain them, and the loss speeds up in later decades. Strength training slows and can partly reverse this. Regular muscle-strengthening is linked to:
- stronger muscles and joints, and easier everyday tasks
- better bone density, which helps lower the risk of osteoporosis and fractures
- improved balance and a lower risk of falls
- healthier blood sugar control and metabolic health
- better mood, confidence and sleep
- support for a healthy body weight, since muscle uses energy even at rest
You do not need to want to look muscular to benefit. Strength is part of healthy aging, and it is never too late to start. Older adults who begin strength training often make clear gains in a matter of weeks.
What the guidelines say
The U.S. Physical Activity Guidelines for Americans and the World Health Organization recommend that adults do muscle-strengthening activities involving all major muscle groups (legs, hips, back, abdomen, chest, shoulders and arms) on two or more days a week, in addition to at least 150 minutes of moderate aerobic activity. If you already walk regularly, strength training is the natural next step. Our guide to how much walking you really need covers the aerobic side.
What you need to get started
You can start with nothing but your body. As you progress, a few inexpensive items add variety and resistance:
- Comfortable clothes and supportive shoes
- A mat or a carpeted area for floor exercises
- Resistance bands, which are cheap, portable and gentle on joints
- Dumbbells, or household items such as water bottles, cans or a backpack filled with books
- A sturdy chair and a wall for support and for exercises like sit-to-stands and wall push-ups

Warm up first
Spend five minutes preparing your body. March in place or walk briskly, roll your shoulders and hips, and do a few gentle arm circles and bodyweight squats. A warm-up raises your heart rate, loosens your joints and lowers your risk of injury.
A simple full-body routine
This routine works every major muscle group with seven movements. Do each exercise slowly and with control, rest 30 to 60 seconds between sets, and stop any exercise that causes sharp pain.
| Exercise | How to do it | Beginner goal | Main muscles |
|---|---|---|---|
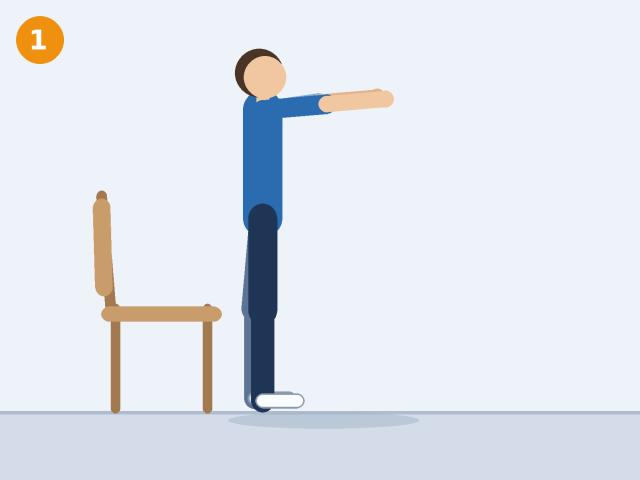
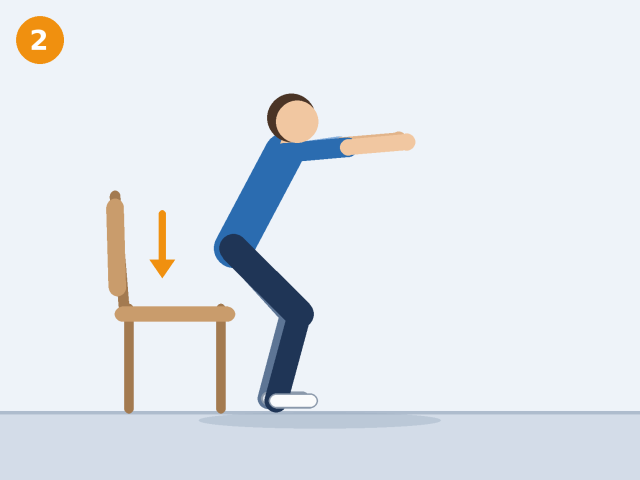
| Sit-to-stand or squat | Stand in front of a chair with feet shoulder-width apart. Lower slowly until you lightly touch the seat, then stand up. | 1 to 2 sets of 8 to 10 | Thighs, buttocks |
| Wall or incline push-up | Place hands on a wall or countertop, body in a straight line. Bend elbows to lower your chest toward it, then press back. | 1 to 2 sets of 8 to 10 | Chest, shoulders, arms |
| Glute bridge | Lie on your back, knees bent. Squeeze your buttocks and lift your hips until your body forms a line from shoulders to knees. Lower slowly. | 1 to 2 sets of 10 to 12 | Buttocks, hamstrings |
| Bent-over row | Hinge forward at the hips with a flat back, holding a band or water bottles. Pull your elbows back toward your ribs, then lower. | 1 to 2 sets of 8 to 12 | Upper back, arms |
| Overhead press | Stand tall with light weights at shoulder height. Press overhead without arching your back, then lower slowly. | 1 to 2 sets of 8 to 10 | Shoulders, arms |
| Bird dog | On hands and knees, extend the opposite arm and leg while keeping your back flat. Hold for a second and switch. | 1 to 2 sets of 6 to 8 each side | Core, back |
| Plank (knees or toes) | Rest on forearms and knees or toes with your body in a line. Hold, breathing normally. | 2 to 3 holds of 15 to 30 seconds | Core, shoulders |
Here is each exercise in pictures. Follow the three numbered steps, and compare your position with the drawings. The illustrations are simplified, so your own equipment and body proportions will look a little different.
1. Sit-to-stand or squat
- Stand tall in front of a sturdy chair with your feet about shoulder-width apart. Reach your arms forward for balance.
- Push your hips back and bend your knees, keeping your chest lifted and your knees in line with your toes.
- Lower until you lightly touch the seat, then press through your whole foot to stand back up.
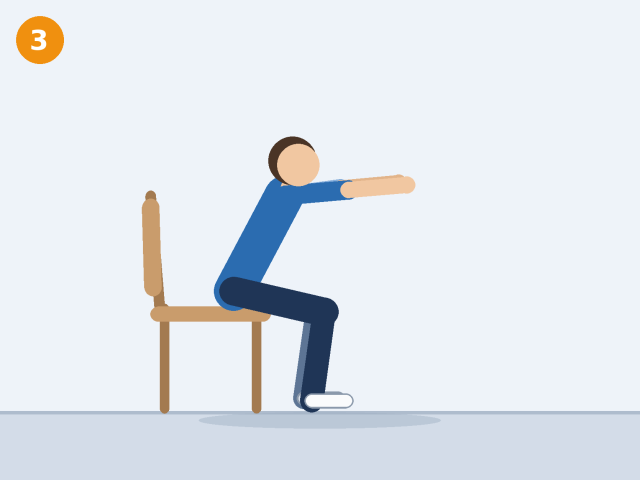
Watch for: Do not let your knees fall inward. If this is too hard, sit on a higher seat or add a firm cushion.
2. Wall or incline push-up
- Stand about an arm’s length from a wall. Place your hands on it at shoulder height, a little wider than your shoulders.
- Keep your body in one straight line from head to heels. Bend your elbows and lean your chest toward the wall.
- Stop when your chest is close to the wall, then press back to the start without letting your hips sag.
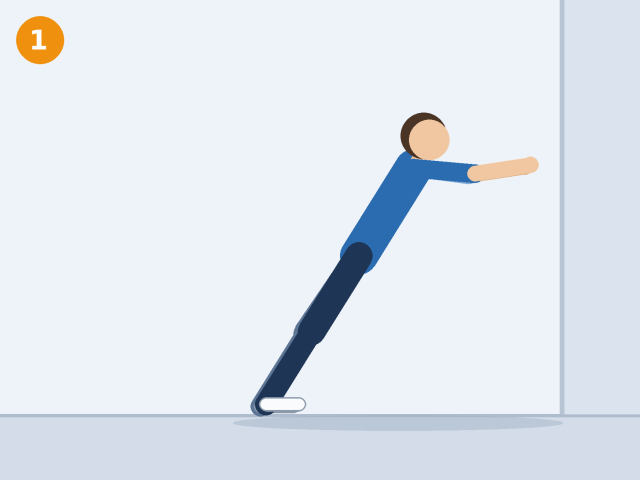
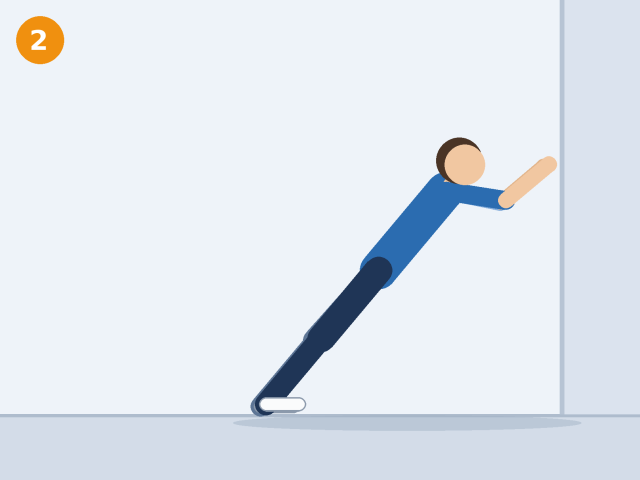
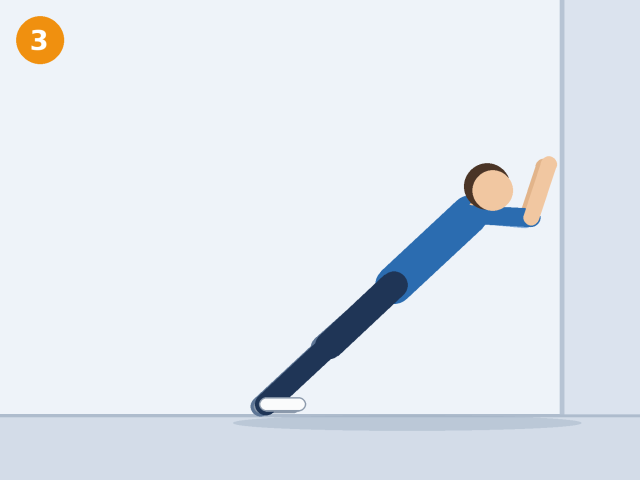
Watch for: Standing farther from the wall makes it harder. When it feels easy, move to a countertop or sturdy table, then to the floor.
3. Glute bridge
- Lie on your back with your knees bent and your feet flat on the floor, about hip-width apart. Rest your arms by your sides.
- Squeeze your buttocks and push through your heels to start lifting your hips.
- Lift until your body forms a straight line from shoulders to knees. Pause for a second, then lower slowly.
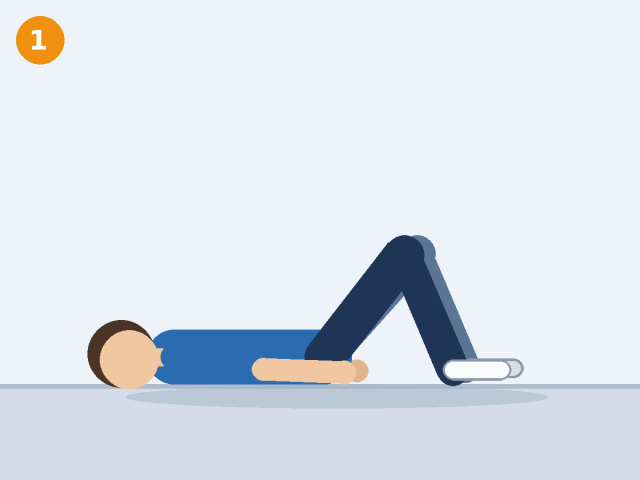
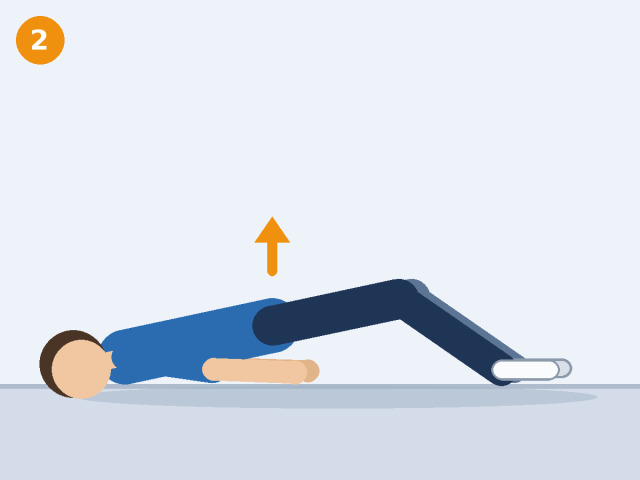
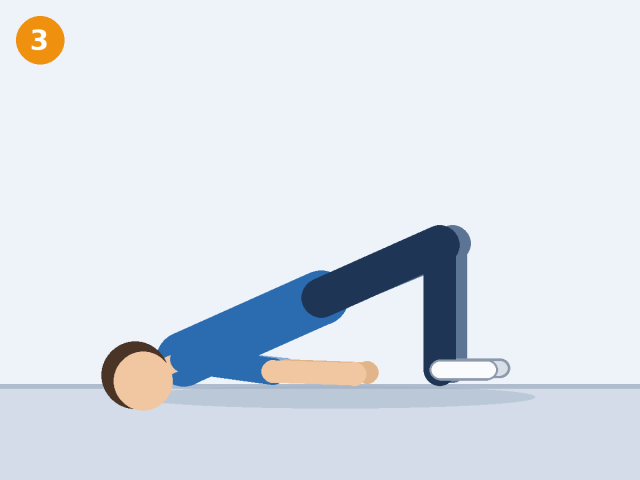
Watch for: Keep your ribs down and do not arch your lower back. If you feel it in your back more than your buttocks, lift a little less.
4. Bent-over row
- Stand with your feet hip-width apart and your knees slightly bent. Hinge forward from the hips with a flat back, arms hanging down holding weights or a band.
- Pull your elbows back toward your ribs, squeezing your shoulder blades together.
- Pause with your elbows close to your body, then lower the weights slowly.
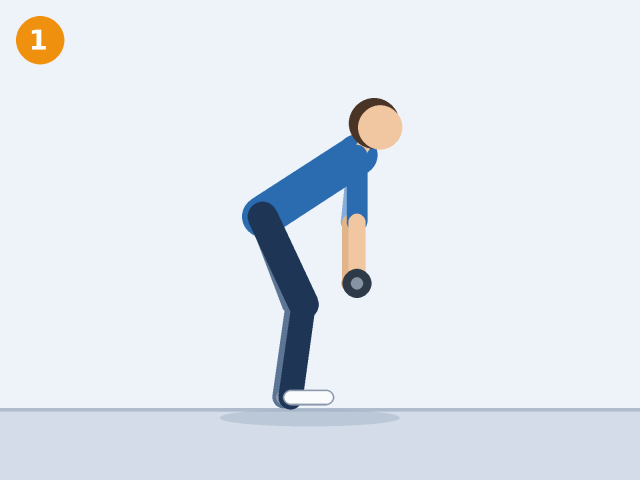
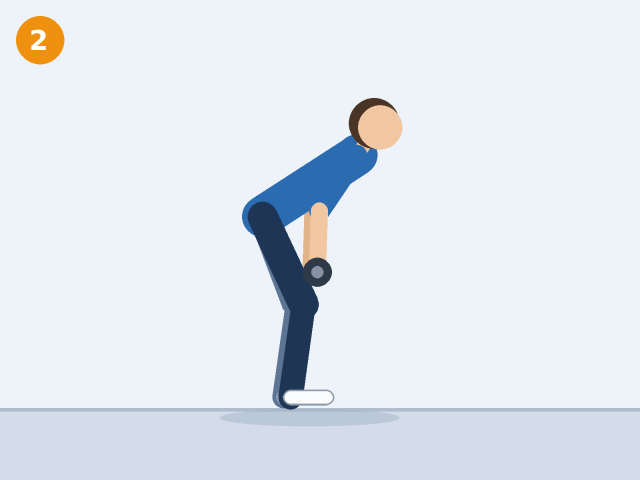
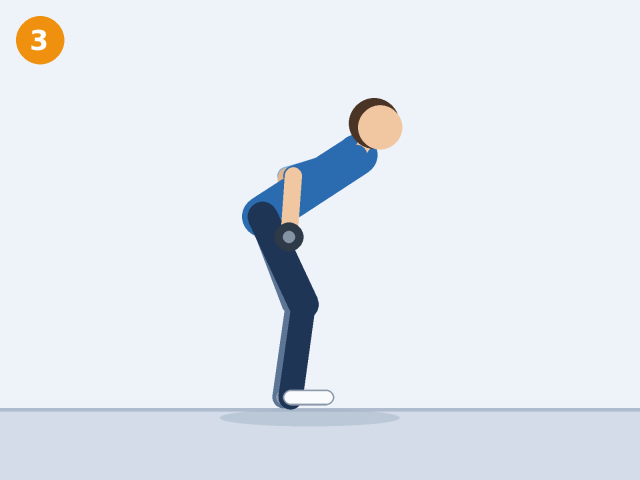
Watch for: Keep your neck in line with your spine and avoid jerking. If your lower back is uncomfortable, rest your free hand on a chair or table.
5. Overhead press
- Stand tall with your feet hip-width apart, holding light weights at shoulder height with your core gently braced.
- Press the weights up and slightly forward, keeping your ribs down.
- Finish with your arms overhead, without arching your back. Lower slowly back to your shoulders.
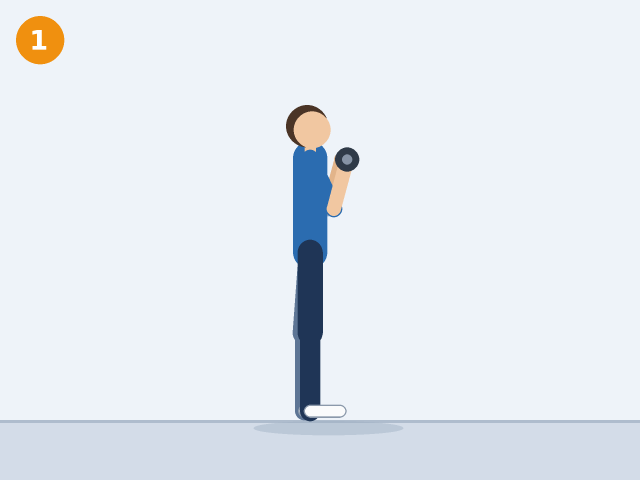
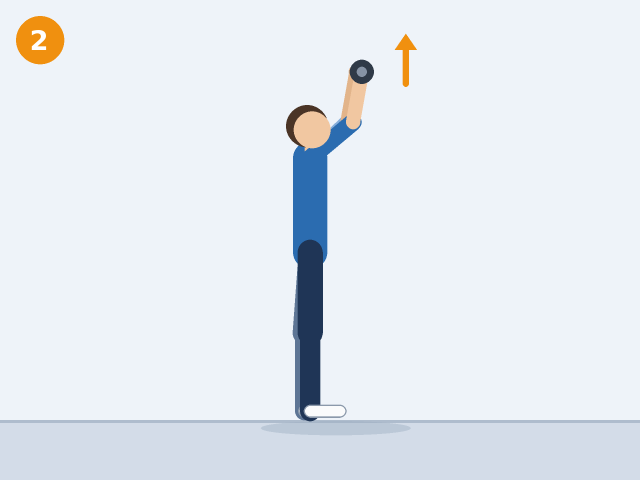
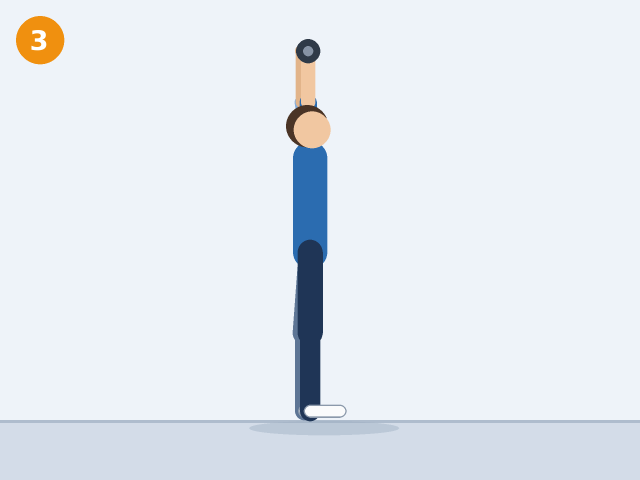
Watch for: Only press as high as is comfortable. If you feel pinching in a shoulder, stop and ask a healthcare professional.
6. Bird dog
- Start on your hands and knees with your hands under your shoulders and your knees under your hips. Keep your back flat and your neck relaxed.
- Slowly reach one arm forward and the opposite leg back, keeping your hips level.
- Hold for a second, return with control, then switch to the other arm and leg.
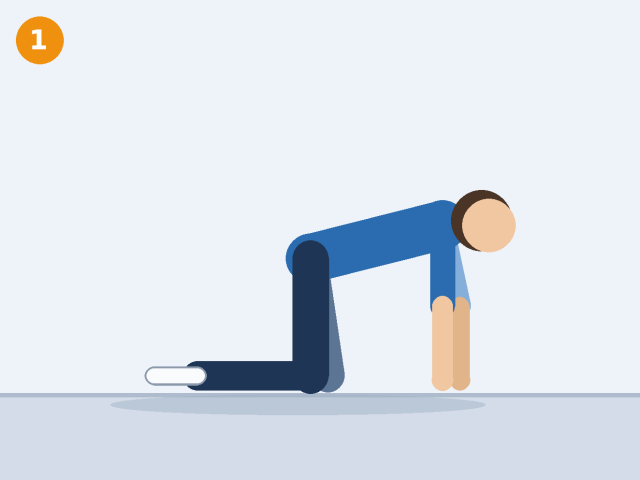
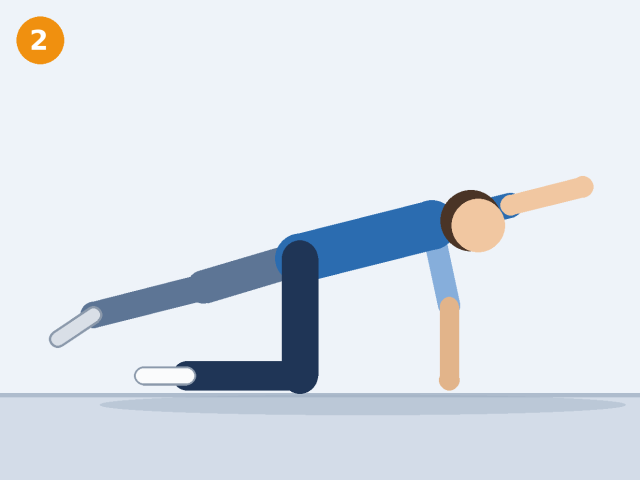
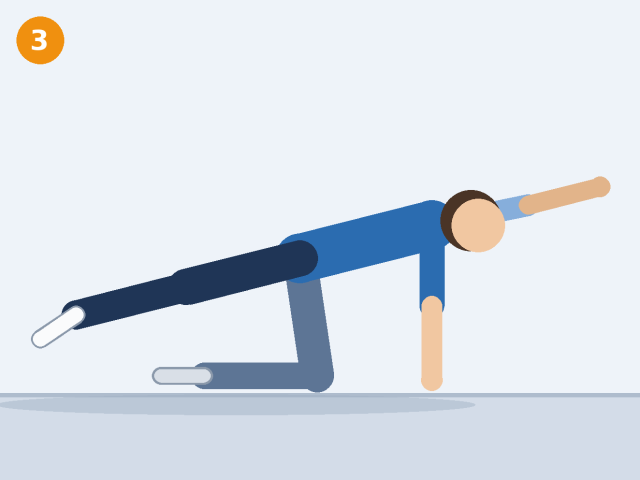
Watch for: Move slowly and do not twist your hips. If it feels wobbly, start by lifting just an arm or just a leg.
7. Plank (knees or toes)
- Start on your knees. Rest on your forearms with your elbows under your shoulders and your body in a straight line from head to knees.
- When you are ready, step your feet back so you are on your toes, with a straight line from head to heels. Squeeze your abdomen and buttocks.
- Hold while breathing normally. Stop the hold as soon as your hips start to drop or lift out of line.
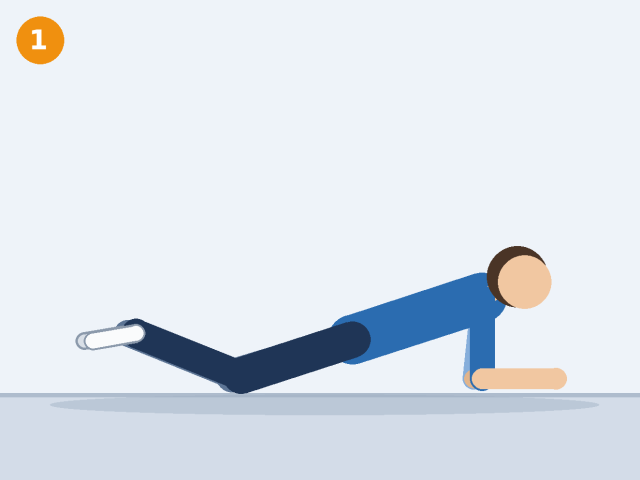
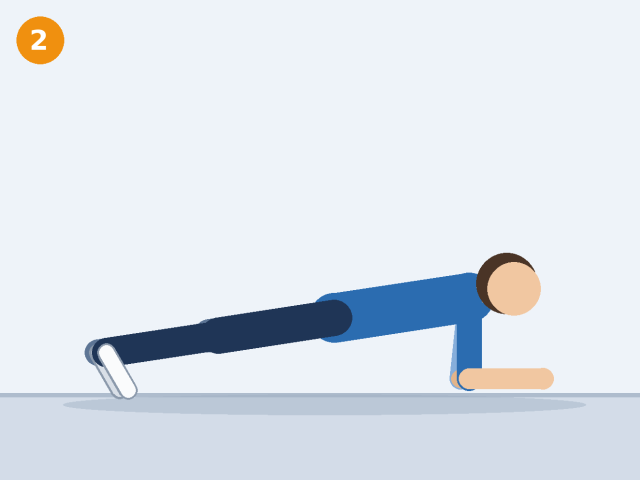
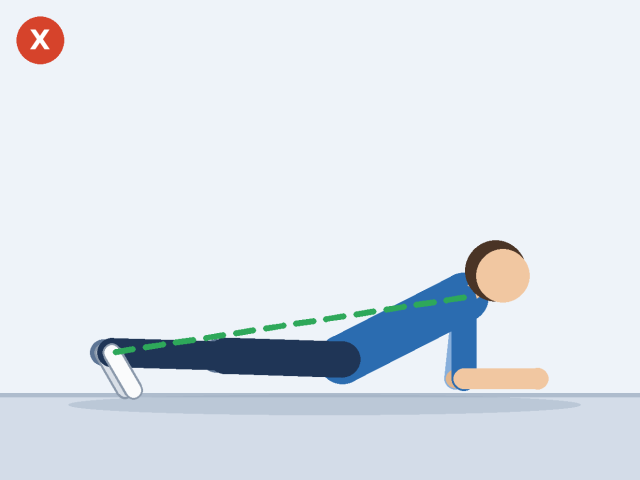
Watch for: Short, clean holds beat long, sagging ones. The green dashed line in the last picture shows the straight line to aim for.
How to progress safely
To keep getting stronger, your muscles need a gradual increase in challenge. This is called progressive overload. Here is a simple way to build up over a month:
| Week | Sets | Repetitions | Focus |
|---|---|---|---|
| Week 1 | 1 | 8 to 10 | Learn the movements and good form |
| Week 2 | 2 | 8 to 10 | Add a second set |
| Week 3 | 2 | 10 to 12 | Slightly more reps, or a slightly heavier weight |
| Week 4 | 2 to 3 | 10 to 12 | Increase resistance when 12 reps feels easy |
A helpful rule of thumb is to increase the load only when you can complete all your repetitions with good form and feel you could have done a couple more. If you cannot, repeat the week or reduce the weight.
Form and breathing tips
- Move slowly. Take about two seconds to lift and three seconds to lower. Momentum cheats your muscles of work.
- Breathe out as you push or lift, and breathe in as you lower. Do not hold your breath.
- Keep your spine neutral. Do not round or arch your back, especially when hinging forward or pressing overhead.
- Control the lowering phase. The slow lowering part builds strength as well.
- Use a mirror or record yourself to check your posture, and start with lighter weights while learning.
Rest, recovery and soreness
Muscles get stronger during recovery, not during the workout. Leave at least one day between sessions for the same muscle groups. Some soreness a day or two after a new routine, known as delayed-onset muscle soreness, is normal and fades in a few days. Sharp, sudden or joint pain is not normal, so stop and rest.
Sleep and food support recovery too. Eating enough protein across your meals and getting good sleep both help your muscles adapt. Our guide to how to sleep better has practical advice.
Common beginner mistakes
- Doing too much too soon. Start light and build gradually to avoid injury and burnout.
- Skipping the warm-up. It only takes five minutes and protects your joints.
- Sacrificing form for heavier weights. If you cannot control the movement, the weight is too heavy.
- Training the same muscles every day. Rest days matter.
- Ignoring pain. Muscle fatigue is fine, but joint or sharp pain is a warning sign.
- Comparing yourself to others. Progress is personal. Consistency beats intensity.
Strength training and your mind
Exercise can be a powerful stress reliever. A short strength session gives your mind something to focus on and releases tension from the body. If you are feeling overwhelmed, combine your workout with the breathing techniques in our guide to the five-minute stress reset.
Common strength training myths
Myth: Lifting weights will make women bulky.
Fact: Building large muscles takes years of heavy training, specific nutrition and, for many people, genetics. Most women who strength train become stronger and more toned, not bulky.
Myth: You have to lift heavy weights to see results.
Fact: Beginners can build strength with bodyweight and light weights. The key is challenging your muscles progressively, not using a particular weight.
Myth: You can burn fat from one area by training it.
Fact: Spot reduction does not work. Fat loss happens across the body, mainly through overall energy balance. Strength training helps by building muscle and supporting your metabolism.
Myth: Cardio is enough.
Fact: Aerobic exercise is excellent for the heart, but it does not fully replace muscle and bone strengthening. Guidelines recommend both.
Check with a professional first if…
- You have heart disease, high blood pressure, diabetes, joint problems, osteoporosis or any other long-term condition.
- You are pregnant or recently gave birth. Exercise is generally encouraged, but the best types and intensity should be personalized.
- You have been inactive for a long time or have had recent surgery or an injury.
- You feel chest pain, dizziness, severe shortness of breath or sharp pain during exercise. Stop and seek medical help.
Frequently asked questions
How often should a beginner do strength training?
Two or three non-consecutive days a week is a good start. That lets each muscle group rest for at least a day before you train it again.
How long should a strength workout last?
Twenty to thirty minutes, including warm-up, is enough for beginners. Quality and consistency matter more than duration.
Do I need weights to build strength?
No. Bodyweight exercises such as squats, push-ups, glute bridges and planks work well at first. Resistance bands or household objects add challenge as you progress.
Is it OK to do strength training every day?
It is better to alternate. If you do train daily, work different muscle groups on different days so each one gets rest. Beginners should start with two or three sessions a week.
Can I do strength training if I am over 60?
Yes. Strength training is one of the most effective ways for older adults to protect muscle, bones and balance. Start gently, focus on form and get your healthcare provider’s go-ahead if you have health conditions.
Strength training does not need to be complicated. Choose a few movements, do them with good form two days a week and add a little challenge over time. In a few weeks you are likely to notice that stairs, groceries and getting up from the floor feel easier.
Sources and further reading
Try our free health tools
Put the numbers from this guide to work with a quick, private calculator.
More wellness guides



This guide is for general information only and is not medical advice. Talk to a qualified healthcare professional about your own situation before making changes to your health routine.